Left Continue shopping
Your Order

You have no items in your cart

Free Shipping on orders $49+

Blog / Manuka Honey 100+

The Real Fruit Roll-Up

The Real Fruit Roll-Up

All Dressed Up for Independence Day

Skip to Recipe

Does anyone else remember laying in the sun, unwrapping your roll of delicious sorta fruit with your friends and pretending you all had ridiculously long tongues? Just us?

You may even see us at the store on occasion, picking up a box of that big brand roll so we can fully immerse ourselves in sunny summer memories... but on other days we just make our own!

Since it is almost Independence Day, we had to go red, white, and blue, aka strawberry, apple, and blueberry. Of course, you can make them with pretty much any fruit you like... except watermelon, don't try watermelon. Cue endless amounts of straining for almost no end product

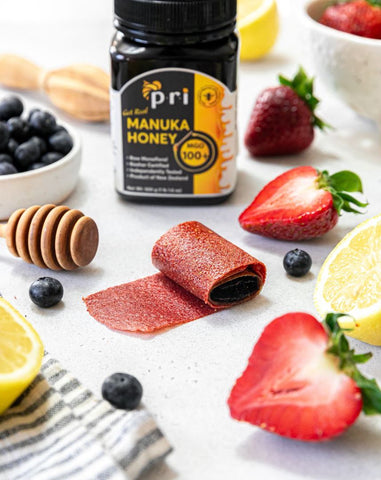
These are super simple to make and only have three ingredients: fruit, manuka honey, and lemon juice. The key ingredient here is patience as they will take 6-8 hours to fully dehydrate!

Our Real Fruit Roll-Ups are perfect for packed lunches, camping, hiking, road trips, BBQs, or just doing silly dances with your "tongue" out 🤪

Here are some directions in super long format, mostly for search engine purposes. Read on, if you love that stuff (no judgement) otherwise, click here to skip to the shorter version of this recipe!

Section 1: Ingredients and Equipment

  • To make these delicious Real Fruit Roll-Ups, you will need the following ingredients and equipment:
    • 3 cups strawberries
    • 2 tbsp PRI Manuka Honey 100+
    • 3 tbsp lemon juice
    • 2 cups blueberries
    • 8 oz unsweetened applesauce or pear applesauce
    • Oven or dehydrator
    • Silpat mat or parchment paper
    • High-speed blender
    • Small saucepan
    • Baking sheet

Section 2: Strawberry Layer

  • Wash and chop the strawberries, then place them into a high-speed blender.
  • Add the PRI Manuka Honey 100+ and lemon juice to the blender.
  • Blend the mixture until smooth.
  • Strain the mixture to remove the seeds.
  • Pour the strained mixture into a small saucepan and heat it on medium/low heat until it thickens.
  • Let the mixture cool and set it aside.

Section 3: Blueberry Layer

  • Rinse the blueberries and place them in a high-speed blender.
  • Add the PRI Manuka Honey 100+ and lemon juice to the blender.
  • Blend the mixture until smooth.
  • Strain the mixture to remove any pulp.
  • Pour the strained mixture into a small saucepan and heat it on low heat for a few minutes until it thickens.
  • Strain the mixture again if needed and let it cool.

Section 4: Apple Layer

  • For the apple layer, you can use either unsweetened applesauce or pear applesauce. Choose your preferred option and set it aside.

Section 5: Assembly and Cooking

  • Preheat your oven to 170F or use a dehydrator.
  • Place a silpat mat or parchment paper on a baking sheet and set it aside.
  • Pour the strawberry layer onto the tray and spread it into an even layer using a spatula. Remember, the thicker the layer, the longer it will take to dehydrate.
  • Next, spoon the applesauce onto the tray and spread it into an even layer with a spatula.
  • Finally, pour and spread the blueberry layer onto the tray, creating the final layer.
  • Cook the fruit layers in the oven or dehydrator for 6-8 hours, or until you can peel the fruit leather back.

Section 6: Finishing and Enjoyment

  • Remove the tray from the oven or dehydrator.
  • Place a piece of parchment paper over the silpat mat and peel the fruit leather off the mat.
  • Roll the parchment paper with the fruit leather, creating a fruit roll-up.
Real Fruit Roll-Ups
Makes: 2 trays

Strawberry Layer:

Blueberry Layer:

Apple Layer:

  • 8oz unsweetened applesauce or pear applesauce
  1. Preheat the oven to 170F or use a dehydrator. Place a silpat mat or parchment paper on a baking sheet and set aside.
  2. Wash and chop strawberries and place them into a high-speed blender with manuka honey and lemon juice. Blend until smooth.
  3. Strain the mixture to remove the seeds. Pour in a small saucepan and heat on medium/low heat until the mixture thickens. Let cool and set aside.
  4. Rinse blueberries and pour into a high-speed blender with manuka honey and lemon juice. Blend until smooth.
  5. Strain the mixture to remove the pulp. Pour in a small saucepan and heat on low heat for a few minutes until the mixture thickens. Strain again if needed and let set aside to let to cool.
  6. Pour strawberry layer onto the tray and spread into an even layer with a spatula. The thicker the layer the longer it will take to dehydrate.
  7. Next, spoon the applesauce onto the next layer and spread into an even layer with a spatula. 
  8. Finally, finish with the blueberry layer, pour and spread into an even layer with a spatula.
  9. Cook for 6-8 hours, until you can peel the fruit leather back.
  10. Remove from the oven, place a piece of parchment over the silpat mat and peel the fruit leather off the silpat mat.
  11. Roll the parchment with the fruit leather until you have a fruit roll up and enjoy!

Our homemade Real Fruit Roll-Ups are not only delicious but also a perfect way to celebrate Independence Day. Recreate those nostalgic memories while enjoying the red, white, and blue flavors. Whether it's for packed lunches, camping adventures, road trips, or simply having fun, these roll-ups are sure to bring a smile to your face.​​

Read more
Dairy-Free Jello Custard Christmas Trifle

Dairy-Free Jello Custard Christmas Trifle

What screams the holidays louder than a Trifle? If you live in New Zealand, home of Manuka honey and birthplace of our co-founder Linda, not much! 

Our CMO, Dominic, hails from England, the birthplace of the modern trifle. Since Dom is married to the CFO and founders’ daughter Kristy, that makes this recipe a verified P.R.I. family favorite!  

Now that the Noll family history lesson is over, we have to admit that we did tweak this a bit from your more traditional recipe by making it dairy free. Since an estimated 70% of people are lactose intolerant, it felt necessary. After all, everyone at your table deserves to enjoy all the delicious holiday goodies!

We also made it non-alcoholic by not soaking the sponge cake in sherry. If all of your party members are of drinking age, we recommend soaking; it is delicious! Simply cut the pound cake, lay it in a baking dish and add sherry until it is moist but not wet. Let it sit while you make the rest of the dessert. If boozy desserts are your jam, you might want to check out our Irish Porter Cake recipe too! 

Dairy-Free Christmas Trifle

Jello Layer:

  • 4 envelopes of unflavored gelatin
  • 3 cups raspberry cranberry juice
  • 1 cup pomegranate juice
  • 1-2 tbsp PRI Manuka Honey
  • 6 oz. raspberries (fresh or frozen)
  • ¼ cup pomegranate arils

Custard Layer:

  • 1 cup full-fat coconut milk or heavy coconut cream
  • 1 cup almond milk
  • ½ cup PRI Manuka Honey 
  • 2 tbsp cornstarch
  • 1 tsp vanilla bean paste or vanilla extract
  • 1 large egg
  • 3 large egg yolks
  • pinch of salt

Other Ingredients:

  • pound cake or angel food cake (store-bought or homemade)
  • 2 - 10 oz. dairy-free whipped topping tubs (use Truwhip brand or make your own coconut whipped cream by whisking coconut cream, honey, and vanilla)
  • 12 oz. fresh raspberries 
  • ½ cup pomegranate arils
  • 2 tbsp sliced almonds
  • fresh mint leaves
  • optional: meringue kisses

Custard Instructions:

  1. Fill a large bowl with ice and water and set aside.
  2. Pour coconut milk and almond milk into a saucepan and bring to a simmer over medium/low heat.
  3. In a medium bowl, whisk together Manuka honey, whole egg, egg yolks, cornstarch, and salt. Place the bowl near the stove for easy access to the milk mixture.
  4. Once the milk begins to simmer, stir well to distribute the heat. 
  5. Then turn off the stove and use a ladle to slowly add the hot milk to the egg mixture while whisking simultaneously. Continue to do this until half the mixture has been whisked in, then pour the rest into the bowl and continue to whisk well until incorporated.
  6. Pour the mixture back into the pot and turn the heat to medium-low. Continuously whisk the mixture as it begins to heat. You’ll notice thickening after 5-10 minutes of whisking. Once it starts to thicken, turn the heat to low and stir well until desired consistency. The custard should be thin but not runny. 
  7. Remove the custard from the heat and stir in vanilla bean paste. 
  8. Cool the custard by placing the bowl inside the ice water bowl and stirring until the mixture cools down. Then cover with plastic wrap and poke holes in the film and refrigerate overnight to thicken.

Jello Instructions:

  1. In a large pot, bring 2 cups of raspberry cranberry juice and 1 cup of pomegranate juice to a boil.
  2. In a large bowl, pour 1 cup of raspberry cranberry juice and sprinkle four unflavored gelatin packets into the juice to cover the surface. Let it sit for a minute to bloom.
  3. Pour the boiling juice into the large bowl with bloomed gelatin and stir well until dissolved. Then add the Manuka honey and stir until it is fully incorporated. This should take about 5 minutes.
  4. Pour the jello mixture into a large trifle dish and then place in raspberries and pomegranate arils. Cover with plastic wrap and refrigerate to set overnight.

Assembly Instructions:

  1. When ready to assemble, remove the trifle dish from the fridge and pipe or spoon the custard into an even layer.
  2. Next, slice the poundcake into large or small cubes and fill the next layer with the cake pieces.
  3. After the cake layer, spread whipped cream across the top and create a mound shape.
  4. Finally, top with a large mound of fresh raspberries. Then sprinkle pomegranate arils and sliced almonds. Finish off with a few mint leaves. Top with store-bought or homemade meringue kisses to take it to the next level!
  5. Serve and enjoy!
Read more
Manuka Honey Sweetened Condensed Coconut Milk + Three Delectable Ways to Use it This Holiday Season

Manuka Honey Sweetened Condensed Coconut Milk + Three Delectable Ways to Use it This Holiday Season

We might have buried the lede on this one. Not that we meant to, of course. For the record, we would never purposefully make such a delicious creation so hard to find.

Remember when we made that Dairy-Free Boba Recipe that tastes like store-bought boba? We couldn’t have made it without one key component - dairy-free sweetened condensed milk or, as some might say, “mylk.”

Your standard sweetened condensed milk contains over 160 grams of refined sugar per cup, making it both amazingly delicious & definitely not for regular consumption. Plus, an estimated 70% of people are lactose intolerant, so it’s important to find options everyone can enjoy - especially around the holidays! 

Since honey contains more fructose than glucose, it is naturally sweeter tasting. This means you can use less honey than sugar in your recipes to achieve the same level of sweetness. We typically swap one cup of sugar for ½ a cup of honey.

What makes it even better is the addition of Manuka honey! Manuka honey is unique because it’s the only honey in the world containing high levels of Methylglyoxal, aka MGO. MGO is the main medicinal component and makes Manuka a powerhouse of antibacterial, antimicrobial, and anti-inflammatory benefits. 

Since MGO  is not killed off by heat, it’s a great way to sneak some health benefits into your desserts. Not only will no one complain, but they might even appreciate the deeper, more complex flavor that comes from using this fantastic sugar alternative.

Now, back to the tasty stuff! Read on to learn how to make an upgraded, dairy-free version of Sweetened Condensed Milk AND three new, delectable, effortless recipes you can create using it! Scroll down, or click below to view each one:


1-Base Sweetened Condensed Coconut Milk

2-Manuka Honey Caramel Sauce

3-The Creamiest Hot Chocolate

4-Chocolate Fudge Truffles

Dairy Free Manuka Sweetened Condensed Milk

Ingredients:

Instructions:

  1. Shake your coconut milk. It should be liquid and not solidified. It should take about 5 minutes. Stir often to prevent the milk from burning.
  2. Once it starts to bubble to the top, reduce the heat to a low simmer. 
  3. Pour in the Manuka honey while whisking continuously. Once the honey is well incorporated, ensure the flame is on low and set a timer for 10 minutes.
  4. When the timer goes off, check the mixture and give it a good whisk. It should start to have a golden color on top. Let it cook for another 10 minutes.
  5. It should look like it will caramelize at the 20-25 minute mark. The key here is to remove it once the milk has reduced, but it doesn’t turn to caramel. You must use your best judgment and keep your eye on the stove at the 20-minute mark.
  6. Remove from the stove and carefully pour the condensed milk into a glass jar with a lid. Use an oven mitt, and be careful, as the glass will be scorching. Close the jar and let it sit on the counter to cool, then place it in the fridge to thicken.
  7. Use in coffee, pastries, desserts, and more!
Manuka Honey Caramel Sauce

Ingredients:

Instructions:

  1. To make the caramel sauce, bring the Sweetened Condensed Coconut Milk to a boil and then reduce it to a low simmer. If using the optional ingredients, also add those now. Stir often to prevent it from burning on the bottom. Depending on your stove, it should take about 15-25 minutes. If you’re making the condensed milk to make the caramel sauce, keep the condensed milk on the stove for an extra 20-25 minutes on a low simmer until reduced, and you have a thick golden brown caramel.
  2. Use an oven mitt, and be careful, as the glass will be extremely hot. Top the lid and let it sit on the counter to cool, then place it in the fridge. Use in dessert, ice cream, coffee, rice cakes, and more!
Hot Chocolate

Serves: 2-3

Ingredients:

  • 2 cups milk of choice (we used oat)
  • ½ cup Manuka-sweetened condensed coconut milk
  • ⅓ cup chocolate chips
  • 1 tsp vanilla
  • Toppings: mini marshmallows, whipped cream, cinnamon

Instructions:

  1. In a saucepan, pour in milk, Manuka-sweetened condensed coconut milk, chocolate chips, and vanilla.
  2. Bring to a boil on medium-high heat. Stir often to help the melted chocolate incorporate into the milk. Reduce to a simmer.
  3. To get an extra frothy and well-mixed hot cocoa, carefully use a milk frother in the saucepan or immersion blender.
  4. Transfer the hot cocoa to a mug and top with mini marshmallows, whipped cream, and cinnamon dusting.
Chocolate Fudge Truffles
 

Ingredients:

  • 7 oz Manuka sweetened condensed coconut milk
  • 3/4 cup cacao powder or cocoa powder (plus more for rolling/dusting)

Instructions:

  1. In a saucepan, bring sweetened condensed coconut milk to a slight boil.
  2. Once boiling, remove from heat, sift in 1/4 cup of cocoa powder, and gently stir until well combined.
  3. Once combined, pour in another 1/4 of a cup of cacao powder, and continue to stir.
  4. Add 1 tbsp at a time of the remaining ¼ cup of cacao until you achieve your desired consistency. The batter should be thick but not too dry. Once you have a fudgy dough, place the dough in plastic wrap and freeze until solidified, at least 30 minutes. Then roll into balls and dust or roll in extra cacao powder. Store in the freezer and enjoy fudgy goodness!
Read more